
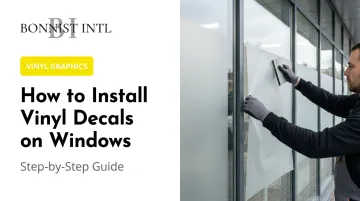
This guide covers the complete installation process — from choosing between wet and dry application to post-install validation — along with the most common failure points and how to fix them.
Key Takeaways
- Dry vs. wet install: dry works for smaller decals (masking tape hinge); wet uses soapy water for repositioning larger ones
- Surface prep is non-negotiable: any dust, grease, or residue beneath a decal causes bubbles or early peeling
- Temperature matters: install within the range on your vinyl's technical datasheet — most specify a minimum of 54–60°F
- Squeegee from center outward to push out air bubbles as you go
- Large, complex installations require a second person — and commercial-scale projects warrant a professional installer
Before You Begin: Surface Prep, Tools, and Prerequisites
Getting the Glass Ready
The single most common cause of adhesion failure is applying a decal to glass that isn't truly clean. Avery Dennison's substrate preparation bulletin specifies a 70% isopropyl alcohol / 30% water solution for glass surfaces — the surface must be completely clean, smooth, and dry before application.
ORAFOL similarly recommends cleaning with mild detergent and water before vinyl application. Both manufacturers agree: surface prep is where most installations succeed or fail.
What to avoid during prep:
- Ammonia-based window cleaners — they leave residue that interferes with adhesion
- Paper towels, which shed lint onto the glass
- Cleaning in direct sunlight, which causes solution to evaporate and streak before you can wipe it dry
After cleaning, the glass must be fully dry before any decal touches it. The standard: dry to the touch with no visible moisture.
Environmental conditions matter just as much as surface cleanliness. Avoid installation when:
- Rain or high humidity is present outdoors
- Direct sunlight is hitting the glass (creates thermal stress, especially with dark or large graphics)
- Ambient or glass surface temperature falls outside your vinyl manufacturer's specified range
Tools Checklist
Must-haves:
- Lint-free microfiber cloths
- 70% IPA / 30% water solution (or manufacturer-specified cleaner)
- Spray bottle with soapy water (for wet method)
- Soft rubber squeegee or hard-edged card
- Masking or painter's tape
- Tape measure
Nice to have:
- Rubber roller (for large flat sections)
- Level or laser level (for alignment on wide formats)
- Fine pin (for bubble release — use conservatively)
Use a soft squeegee on glass to avoid surface scratches. Firm, overlapping strokes beat aggressive force consistently.
How to Install Vinyl Decals on Windows: Step-by-Step
Vinyl window decals have three layers: the graphic face, the adhesive side, and a protective liner (the shiny, smooth backing). Before starting, confirm which type of decal you have:
- First-surface (outside-facing): adhesive goes against the glass, graphic faces outward
- Second-surface (inside-mounted): printed in reverse so the graphic reads correctly when viewed through the glass from outside; the liner faces the interior side
Confusing the two mid-install is an expensive mistake. Check the product spec before you begin.
Dry Install Method (Best for Smaller Decals)
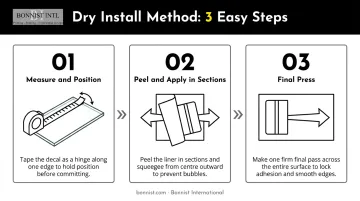
Step 1 — Measure and position Use a tape measure to determine exact placement. Attach the decal to the glass with masking tape along the top edge, creating a hinge. This lets you fold the decal up and down without losing alignment.
Step 2 — Peel and apply in sections Fold the bottom half of the decal up, peel away the lower portion of the liner, then fold the decal back down. Using a squeegee in firm, overlapping strokes from the center outward, press the bottom half onto the glass. Remove the masking tape hinge. Peel the remaining top liner and repeat the squeegee motion for the top half.
Step 3 — Final press Run the squeegee firmly across the entire decal one more time, working center to edges, to eliminate any remaining air pockets.
Wet Install Method (Best for Larger Decals)
The wet method prevents the adhesive from bonding on contact, giving you time to reposition before committing. Note: Do not use the wet method with air-egress films (such as Avery Easy Apply or RapidAir). These films require dry application: the perforations trap liquid and will compromise performance if wet.
Step 1 — Mix and spray Prepare a soapy water solution, following your vinyl manufacturer's stated ratio. Ratios vary: Avery Dennison's wet application bulletin specifies ½ tsp detergent per gallon; ORAFOL specifies 1 tsp of dish detergent per quart. Spray both the adhesive side of the decal and the glass surface liberally.
Step 2 — Place and slide into position Apply the decal to the wet glass and slide it into the correct alignment. Use a level or pre-marked tape guides on the glass for large formats. Work efficiently: the soapy layer gives you a repositioning window, not unlimited time.
Step 3 — Squeegee out the liquid Starting from the center and moving outward in firm, overlapping strokes, push all soapy water out from under the decal toward the edges. Wipe away excess liquid around the perimeter. Follow your vinyl manufacturer's guidance for how long to allow the adhesive to set before the decal is handled or exposed to weather.
Post-Installation Checks
Once the decal is down, don't skip the inspection step. Run your hand across the surface to feel for raised edges or areas with no contact. Hold a light at an oblique angle to the glass — this reveals trapped air or moisture pockets that aren't visible head-on.
What to look for and address:
- Poke small air bubbles at the edge with a fine pin, then re-squeegee outward (only if your vinyl's installation guide permits this)
- Press raised edges firmly with the squeegee right away; if they re-lift, something interfered with adhesion at that spot
- Address visible moisture under the graphic immediately, as trapped liquid can cloud graphics over time
Post-install care timeline:
| Period | What to avoid |
|---|---|
| First 24 hours | Cleaning, rain, pressure washing |
| First 7–14 days | Cleaning with any solutions (ORACAL guideline for decorative window films) |
| First 30 days | Cleaning architectural window film adhesives (Avery Dennison guideline) |
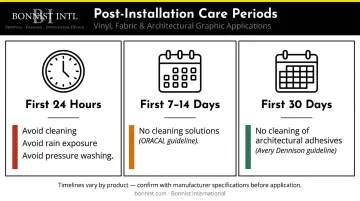
The table above captures common benchmarks, but cure timelines differ by product. Check your vinyl manufacturer's technical bulletin directly; waiting periods range from 24 hours to 30 days depending on film type and adhesive system.
For exterior graphics, Avery Dennison's wet application guidelines also recommend edge sealing with neutral silicone within 72 hours.
Common Installation Problems and Fixes
Air Bubbles That Won't Smooth Out
Bubbles that persist after multiple squeegee passes usually mean strokes went toward the center rather than outward, or a thin residue layer on the glass prevented full contact.
- For isolated small bubbles, poke the edge with a fine pin and re-squeegee outward
- For widespread bubbling across the graphic, peel from one corner and reapply using the wet method — that's the more reliable reset
Decal Lifting or Peeling at Edges
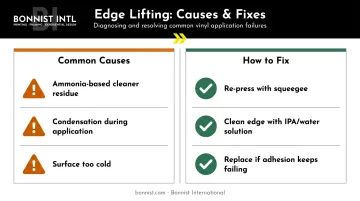
Corners or edges that separate within days typically trace back to one of three causes: ammonia-based cleaner residue on the glass, condensation during application, or a surface that was too cold when the decal went down.
Fix: Press the lifted section back firmly with a squeegee. If it doesn't re-bond, clean the glass under the edge with a clean IPA/water solution, let it dry completely, and re-press. Adhesion that keeps failing is a sign the decal needs replacing — a compromised adhesive edge rarely holds long-term.
Misalignment or Crooked Placement
A decal that reads off-level or off-center almost always means no tape hinge or measurement reference was used before peeling the liner.
For a wet install caught in the first few seconds, slide the decal to the correct position before squeegee contact. For a dry install that has already bonded, peel slowly from one corner and reposition immediately — dry adhesive bonds fast, and waiting more than a minute or two risks stretching or tearing the vinyl.
Pro Tips for Installing Window Decals Effectively
Timing and environment:
- Install in the morning or on overcast days — glass not warmed by direct sunlight is more stable
- Avoid cold glass even inside a heated room; the glass surface itself may fall below the manufacturer's minimum even if air temperature doesn't
- For outdoor installations, avoid wind — it causes large decals to fold onto themselves mid-application
Handling and alignment:
- For any decal too large for one person to hold flat, align accurately, and squeegee without premature contact, use two people
- Mark placement with removable painter's tape on the glass before peeling any liner
- Use a level; eyeballing straight lines on glass rarely works at larger sizes
When to call in a professional: For large-scale commercial window graphics — full-storefront vinyl, branded corporate lobby glass, or multi-panel arena installations — professional installation is the lower-risk choice. Misalignment across a multi-panel glass facade can't simply be peeled and redone without real cost.
Bonnist International manages end-to-end vinyl window graphic installations for clients including NYCFC — branded Dusted Crystal vinyl across interior and exterior glass panels throughout their headquarters — MetLife Stadium, and MSG. Their process runs from design and material selection through precision on-site installation.
Documentation tip: Photograph the finished installation from multiple angles immediately after completion and again after the first 24 hours. This creates a visual baseline for quality checks and supports any warranty claim if the decal develops issues.
Frequently Asked Questions
Do you put window decals on the inside or outside?
Standard decals apply to the outside of the glass with adhesive against the surface. Inside-glass decals (second-surface) are printed in reverse so the graphic reads correctly from outside when mounted indoors. Check which side the liner faces — that tells you the intended mounting orientation.
Do you apply window decals wet or dry?
Small decals apply best dry using the masking tape hinge method. Large decals benefit from the wet method, which prevents premature bonding and allows repositioning before squeegeeing locks the decal in place. Never use wet application with air-egress films.
How do you get air bubbles out of window decals after installation?
Small isolated bubbles can be released by poking with a fine pin at the bubble's edge and re-smoothing outward with a squeegee. Widespread bubbling usually means the decal needs to be carefully peeled back and reapplied. The wet method gives better control on the second attempt.
How long should you wait after installing a window decal before cleaning it?
Avoid cleaning, rain exposure, and pressure washing until the manufacturer's specified post-install period has passed. This ranges from 24 hours for some films to 7–30 days for others. Check your product's technical bulletin, as cure times vary by film type and adhesive.
What temperature is best for installing vinyl window decals?
Install within the temperature range stated on your vinyl's technical datasheet. Manufacturer ranges vary: 3M cites 54–100°F for building window graphics, while Avery Dennison's wet application guidelines specify 60–77°F. Cold temperatures reduce adhesive tack; excessive heat can cause premature bonding before you finish squeegeeing.
Can you reposition a vinyl window decal once it has been applied?
With the wet method, repositioning is possible in the first several seconds before squeegeeing begins. With a dry install, once the adhesive contacts the glass, repositioning is extremely limited — attempting it risks stretching or tearing the vinyl. Mark your alignment points on the glass with masking tape before you peel the liner.