Many people assume photo engraving works the same as engraving text or a logo. It doesn't. Text is either engraved or it isn't — a binary mark. Photos require the laser to reproduce a continuous tonal range, which demands a more deliberate workflow at every stage. Skip one preparation step and the result suffers regardless of how well everything else is dialed in.
This guide covers the exact materials, image prep sequence, step-by-step process, and critical settings needed to get a clean photo engraving on the first or second attempt.
Key Takeaways
- Cast acrylic produces crisp, frosty-white photo engraving; extruded acrylic gives dull, low-contrast results
- Extruded acrylic is not suitable for photo engraving — use cast acrylic only
- Image preparation (grayscale, contrast, sharpening, inversion) matters more than laser settings
- CO2 lasers work on all acrylic types; diode lasers cannot engrave clear acrylic without a masking layer
- Always invert the source image before engraving — the laser creates white marks, so an uninverted photo produces a negative
- Run a small test patch on scrap acrylic before committing to the full image
What You Need Before Laser Engraving Photos on Acrylic
Getting the right result starts before you touch the laser settings. A low-quality source image or the wrong acrylic type introduces compounding problems that no amount of power and speed adjustment can fix.
Equipment and Laser Requirements
Three laser types are commonly used for acrylic engraving, and they are not interchangeable:
| Laser Type | Wavelength | Clear Acrylic | Colored/Opaque Acrylic |
|---|---|---|---|
| CO2 | 10,600 nm | ✅ Yes | ✅ Yes |
| UV | 355 nm | ✅ Yes (fine detail, minimal heat) | ✅ Yes |
| Diode | ~450 nm | ❌ No (passes through) | ⚠️ With limitations |
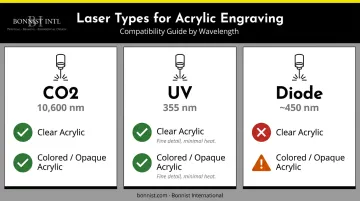
Epilog and Trotec both confirm that CO2 lasers at 10,600 nm are absorbed by all colors and types of acrylic, making them the standard choice for photo engraving. UV lasers at 355 nm offer fine-detail marking with minimal heat buildup (useful for intricate work).
Diode lasers (typically blue, ~450 nm) pass straight through clear acrylic without being absorbed. They require a colored or opaque substrate, or a masking layer applied to clear acrylic.
There is no universal wattage minimum for photo-quality engraving. Epilog's material settings include acrylic photo engraving configurations for machines as low as 30W — what matters is matching power and speed to your specific machine and material through test engraving.
Materials and Image Quality Requirements
Cast acrylic is the correct material for photo engraving. When a CO2 laser hits cast acrylic, it vaporizes the surface and leaves a bright, frosty-white mark. Trotec confirms that extruded acrylic produces little to no contrast — the result appears gray, dull, or nearly invisible.
Check the supplier label or specification sheet: cast acrylic is typically labeled "GS," "cast," or "cell-cast." Extruded acrylic is labeled "XT" or "extruded." If the label is missing, ask before buying.
Your source image also determines the outcome. Requirements:
- Minimum 300 DPI at the final engraving size
- Strong tonal range — well-lit, with clear highlights and shadows
- Clean subject matter with defined edges (soft focus or motion blur engrave poorly)
Before starting, remove the protective film from the engraving surface only. Leave the film on the back side to prevent scratches during the job.
Skill, Safety, and Software Readiness
- Ventilation: CO2 laser engraving on acrylic produces fumes — use dedicated fume extraction or engrave in a well-ventilated space
- Eye protection: Wear laser safety eyewear appropriate to your laser's wavelength
- Supervision: Never leave the machine unattended during a run
- Software: In LightBurn, set the image mode to Pass-Through for pre-processed photo files — this prevents LightBurn from applying its own dithering algorithm over your already-prepared image
How to Laser Engrave Photos on Acrylic
Step 1: Select and Verify Your Acrylic
Confirm cast acrylic before starting — not after the job produces a disappointing result. Choose thickness and color based on the intended display:
- Black acrylic: White engraving appears with maximum contrast; strong choice for portrait work
- Clear acrylic: Creates a translucent frosted effect; particularly striking when backlit
Place the sheet on a flat surface and use a level to confirm it sits evenly. Any bow or warp in the sheet will cause focus inconsistencies across the engraving area. Secure it flat on the machine bed before proceeding.
Step 2: Prepare the Source Image
The laser deposits tiny dots. If the source image is blurry, low-contrast, or incorrectly processed, no power or speed adjustment will recover it — image preparation determines the final result.
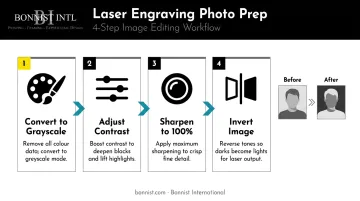
Required editing sequence:
- Convert to grayscale — Simplifies the tonal range and removes color data that the laser cannot reproduce
- Adjust contrast — Lift shadows slightly and pull highlights down; avoid pure black or pure white areas, which the laser either over-engraves or skips entirely
- Sharpen to approximately 100% — Define hair, skin texture, and edges so the laser has clear tonal transitions to reproduce
- Invert the image — Because the laser creates white marks on acrylic, dark areas in the original must become light in the file. Without inversion, the engraved result is a photographic negative
If the image still looks flat or blurry after all adjustments, the source file lacks sufficient detail. Either source a higher-resolution version or run the file through an AI image upscaler before re-processing.
Step 3: Import and Configure the Software
Import the prepared, inverted image into LightBurn, RDWorks, or similar engraving software. Set the image mode to Pass-Through — this tells the software to engrave the image exactly as imported, without applying additional halftone or dithering processing. DPI then controls how densely those dots are placed across the surface.
DPI settings for photo engraving on acrylic:
- 300 DPI minimum — acceptable for many applications
- 300–600 DPI — the documented working range for photo engraving, per Epilog and Trotec guidance
- 333–500 DPI — Trotec's acrylic-specific recommendation for most photo work
- Higher DPI increases job time and heat input — balance detail requirements against those tradeoffs
Confirm the image dimensions in the software match the actual acrylic piece before running the job.
Step 4: Run a Test Engrave First
Before committing to the full image, crop a detail-rich section — eyes, hair, or fabric texture — and engrave it on a scrap piece from the same acrylic sheet.
| Result | Cause | Fix |
|---|---|---|
| Loss of fine detail, melted edges | Too much power | Reduce power or increase speed |
| Faint, barely visible marks | Too little power | Increase power or reduce speed |
| Sharp, defined edges, no melting | Correct settings | Proceed to full job |
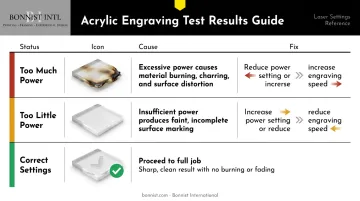
The target is the sharpest visible edge definition with no melting, bubbling, or surface distortion.
Step 5: Engrave, Monitor, and Clean Up
With settings confirmed, secure the acrylic flat on the engraving platform. Run the frame preview function (if available) to verify positioning before the laser fires. Start the job and stay present, and do not leave the machine unattended.
After engraving:
- Allow the piece to cool before handling
- Clean smoke residue from the engraved surface with a soft cloth and isopropyl alcohol
- Remove the protective film from the back of the sheet
- Inspect engraving depth and consistency across the full image before declaring the piece complete
Key Parameters That Affect Photo Engraving Quality
Unlike text or logo engraving, photo engraving must reproduce a continuous tonal range — not simply on/off marks. Small parameter changes produce visible differences in the finished piece.
Power Setting
Power controls engraving depth and the whiteness intensity of the marks. The range between too much and too little is narrow:
- Too high: Melts or warps the surface, destroying fine detail
- Too low: Produces marks so shallow they fade into the material
Trotec notes that excess power can make the engraving too deep and actually remove the bright white appearance that makes photo engraving on acrylic distinctive. The narrow optimal range varies by machine wattage — always establish it through test engraving rather than guessing.
Speed Setting
Speed and depth work inversely: slower speed means more dwell time, which means deeper and brighter marks. Faster speed produces lighter, shallower marks. Speed also affects heat accumulation — running too slowly on dense photo areas can warp the acrylic or cause discoloration around the engraved zones.
DPI
DPI determines how many laser dots the machine places per inch. Higher DPI captures more tonal gradation — important for skin tones, gradients, and fine textures — but increases job time and heat input. Trotec warns that placing laser pulses too closely together raises the heat load on the material, which can affect surface quality.
Epilog's documentation indicates that 300 DPI with a quality dithering algorithm can produce results comparable to 600 DPI — with significantly shorter job times. Use higher DPI only when the image's detail level actually demands it.
Image Inversion and Tonal Range
Inversion is a technical requirement, not a stylistic choice. The laser creates white marks where it fires, so an uninverted image produces an exact negative of the original photo.
Compressed tonal range is a separate problem. Images with large areas of pure black or pure white cause the laser to either continuously over-engrave those zones (losing all texture) or skip them entirely. This is why pulling back extreme shadows and highlights during contrast adjustment in Step 2 matters before the file ever reaches the laser.
Common Mistakes and Troubleshooting
Most failed acrylic engravings trace back to a short list of avoidable errors. Catching them before the job runs saves material, time, and frustration.
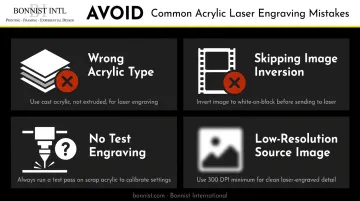
- Using extruded acrylic: The engraved result appears dull, gray, or nearly invisible. Verify acrylic type from the supplier label before starting — not after the job fails
- Skipping image inversion: The finished piece looks like a photographic negative. Re-edit the source file, invert correctly, and re-run
- No test engraving: Over- or under-powered settings either melt surface detail or produce barely visible marks. Always run a scrap test patch first
- Low-resolution source image: Blurriness in the source is exaggerated after engraving. Replace soft images with a higher-resolution version or run them through an AI upscaler before reprocessing
Conclusion
Laser-engraved photos on acrylic come down to three equally critical factors: cast acrylic as the material, a properly prepared and inverted source image, and laser settings confirmed through test engraving. A failure in any one area produces a poor result regardless of how well the other two are executed.
Those three factors get more demanding when you're producing at scale. For B2B applications — corporate recognition awards, hospitality wall displays, sports venue photo installations — consistency across an entire run is non-negotiable, not just a nice outcome.
Bonnist International has spent 33 years delivering custom fabrication, acrylic-based displays, and large-scale visual installations across sports venues, corporate environments, and hospitality properties. Organizations that need photo-quality acrylic pieces produced reliably at volume can reach their team at david@bonnist.com or 845-368-2220.
Frequently Asked Questions
Can you laser engrave a photo on acrylic?
Yes. Laser engraving a photo on acrylic produces a frosted white image with strong visual contrast. Achieving clean, professional results requires specific image preparation steps — including grayscale conversion, contrast adjustment, and inversion — along with cast acrylic as the material.
What type of acrylic is best for photo laser engraving?
Cast acrylic is the clear choice. It reacts to CO2 laser engraving with a bright, high-contrast white mark that reproduces tonal detail accurately. Extruded acrylic produces little to no contrast — the engraved areas appear gray or dull, making it unsuitable for photo work.
Do I need to convert my photo to grayscale before laser engraving on acrylic?
Yes — grayscale conversion is a required step. It removes color data the laser cannot interpret, simplifies tonal editing, and allows accurate contrast and sharpness adjustments that reflect how the laser will reproduce highlights and shadows on acrylic.
Why does my laser-engraved photo on acrylic look like a negative?
This is almost always caused by skipping the image inversion step. Because the laser creates white marks, the source image must be inverted so the laser fires on the correct pixels. Without inversion, the tonal map is reversed — light areas in the original become dark in the engraving, and vice versa.
Can a diode laser engrave photos on clear acrylic?
No — diode lasers pass through clear acrylic without being absorbed, so they cannot engrave it directly. For photo engraving with a diode laser, use colored or opaque acrylic, or apply a light-blocking masking layer (such as dark paint or marker) to clear acrylic before engraving.
What DPI should I use when laser engraving a photo on acrylic?
For photo engraving on acrylic, 300–600 DPI is the standard range, with 333–500 DPI as a practical starting point for most CO2 laser work. Higher DPI captures more tonal gradation in skin tones and gradients but increases job time and heat input on the material.