Key Takeaways
- A foam board or acid-free mat board insert is essential — pinning fabric directly to backing produces a limp, unprofessional result
- Positioning follows sport conventions: baseball shows the front; football, basketball, soccer, and hockey typically show the back
- Frame sizing typically falls in the 30"×36" to 32"×40" range by sport — always measure your jersey at full stretch before ordering
- Conservation-grade UV glazing (rated at 97%+ UV protection) is non-negotiable for signed or valuable jerseys
- Institutional venues (arenas, locker rooms, facility corridors) require professional custom framing for consistent, display-ready results
What You Need to Frame a Sports Jersey
Having the right materials on hand before you start prevents costly mid-project rework — especially for large or multi-jersey projects.
Essential tools and materials:
- Measuring tape
- Clothing iron (low heat)
- Acid-free foam board or mat board (a 30"×42" sheet covers most adult jerseys)
- Straight pins
- Needle and thread or masking tape
- Scissors or utility knife
- Glass cleaner (lint-free cloth)
Frame and glazing requirements:
- A frame sized to accommodate the jersey at full stretch — typically 30"×36" to 32"×40" for most adult jerseys, with football often needing the larger end of that range
- UV-protective glazing rated at conservation grade (97%+ UV protection); Tru Vue's Conservation Clear Acrylic provides 99% UV protection and is lighter and more shatter-resistant than glass
- A backing board in a color that complements team colors
Optional upgrades worth considering:
- Custom double matting in team colors
- Engraving plates with player name, number, and season
- Photo cutouts within the matting layout for added memorabilia context
One practical note on materials: the CCAHA cautions that ordinary foam board can become acidic over time, potentially damaging organic materials like jersey fabric. Specify acid-free or archival-grade substrates wherever possible.
How to Frame a Sports Jersey: Step-by-Step
Step 1: Iron and Prep the Jersey
Iron the jersey thoroughly on a low-heat setting appropriate for the fabric. This is the single most important prep step: the insert holds fabric in exactly the position it's pinned, so any wrinkles you leave in now are permanent.
Lay the jersey flat on a clean surface and do a preliminary placement test against the backing board before cutting anything. Confirm the orientation, centering, and spacing look right before committing.
Step 2: Measure and Cut the Main Body Insert
Measure the jersey's width (under the sleeves) and height (collar to hem). Add approximately one inch to the width measurement to achieve a naturally stretched-out appearance.
Cut a rectangle from your board to these dimensions. Then trace and cut out the collar area and shoulder slopes so the insert sits hidden beneath the fabric without creating visible lumps at the neckline.
Step 3: Create and Fit the Sleeve Inserts
For jerseys with wide or prominent sleeves (particularly football), cut separate sleeve inserts using three measurements:
- Width of the sleeve bottom
- Overall sleeve height
- Height of the lower sleeve rectangle
Test-fit both the body insert and sleeve inserts together. The jersey should look fully structured, with no sagging sections or bunching at the collar or hem. If something looks off at this stage, adjust the insert before pinning anything down.
Step 4: Center and Pin the Jersey to the Backboard
Use a measuring tape to confirm the jersey sits centered on the backing with roughly two inches of backing visible on all sides under the matting.
Insert straight pins at a slight inward angle (about 10 degrees) starting at the collar, then moving to the shoulders, down the sides, and across the bottom hem. Tuck any excess fabric at the bottom underneath the mat board insert rather than leaving it bunched.
Step 5: Attach Photos or Engraving Plates to the Matting
If your layout includes photo cutouts or a player nameplate, flip the double matting face-down and use masking tape to secure these items. Back photos with a cut piece of mat board slightly larger than the photo for added rigidity.
Add foam strip spacers along the inside edges of the matting to keep it level and prevent any sections from sagging toward the jersey. With the matting fully assembled, you're ready to move on to the final step: cleaning and sealing the frame.
Step 6: Clean, Seal, and Assemble the Frame
Clean both sides of the UV-protective acrylic or glass thoroughly with a glass cleaner before assembly. Lint and fingerprints are impossible to remove once the frame is sealed.
Make sure no part of the jersey fabric touches the cover directly — the Library of Congress preservation guidelines specify that framed objects should not touch glazing; use mats or spacers to maintain separation. Secure the back tabs or hardware, then optionally seal the back edges with masking tape to prevent tabs from loosening over time.
How to Position Different Types of Sports Jerseys
Positioning conventions exist for good reason — they highlight each sport's most visually distinctive design elements.
| Sport | Display Orientation | Key Considerations |
|---|---|---|
| Football | Back displayed, sleeves fanned out horizontally | Horizontal layout works best given the sleeve spread; shows sleeve patches and number clearly |
| Baseball | Front displayed, sleeves folded over the top | Showcases pinstripes, chest branding, and patches — the front is the design story in baseball |
| Basketball | Back displayed, sleeves folded neatly inward | Compact profile fits cleanly in a standard frame; vertical framing suits the jersey's length |
| Soccer | Back displayed, sleeves folded forward | Slim sleeves fold more cleanly than American football; similar approach to basketball |
| Hockey | Back displayed, sleeves folded along the body sides | Hockey jerseys are bulkier — ensure sufficient frame depth so fabric doesn't press against glazing |
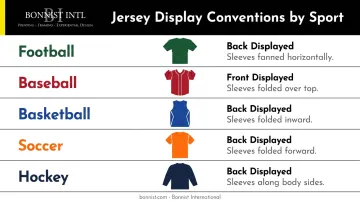
These are starting points, not hard requirements. Baseball is the notable exception — its front-facing display leads with chest branding, whereas every other major sport defaults to the back to feature the player name and number. If your jersey has a unique patch, commemorative detail, or sponsor logo on the front, that side may tell the stronger visual story regardless of sport. Trust the jersey itself to guide the decision.
Key Factors That Affect Framing Quality
UV Protection
This is where most people cut corners and regret it. Standard clear glass blocks only up to 45% of UV rays according to Tru Vue's own specifications — conservation-grade products block 99%. The NEDCC notes that light damage to cloth, inks, and colorants is cumulative and irreversible. For a signed jersey, that means a fading autograph you can never recover.
Conservation-grade acrylic is often the better choice for large jersey frames: lighter, shatter-resistant, and just as effective at UV blocking.
Matting and Backing Color
The mat color does more visual work than most people expect. Team colors in the matting create a display that looks intentional and custom; a mismatched neutral can flatten even a beautiful jersey.
Black backing is a common professional choice because it provides strong contrast without competing with the jersey itself. This approach is evident in the corridor jersey installations Bonnist International has completed for the Brooklyn Nets.
Insert Quality and Pinning Technique
A poorly cut insert produces a jersey that looks lumpy, asymmetrical, or slack inside the frame. The insert is structural: it determines how the finished piece reads from across a room.
Fit it precisely, paying attention to:
- The collar cutout, which shapes the neckline's silhouette
- Sleeve inserts, especially for wider jerseys
- Even tension across the body to eliminate sagging or bunching
Common Mistakes and When to Call a Professional
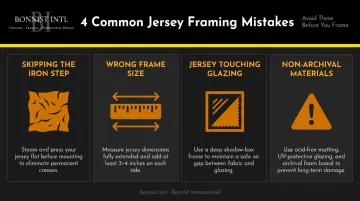
Four mistakes account for most framing failures:
- Skip the iron step and you lock in every wrinkle permanently — the insert holds fabric exactly as it was pinned.
- Choose the wrong frame size and awkward folding cuts off numbers or logos. Measure at full stretch before selecting. Most adult jerseys fit 30"×36" to 32"×40", with football needing the larger end.
- Let the jersey contact glazing and fabric distortion sets in over time. Mats or spacers are required — not optional.
- Use non-archival materials and ordinary foam board or acid-prone substrates will deteriorate and damage the fabric. Specify archival-grade substrates from the start.
When Professional Framing Makes Sense
DIY framing works reasonably well for a casual display. But those four mistakes above compound quickly on high-value pieces — and for one-of-a-kind signed jerseys, institutional displays, or multi-jersey installations, the gap between DIY and professional results is substantial.
Bonnist International has over 33 years in custom framing and sports memorabilia display. The client list includes the Brooklyn Nets, New York Knicks, New York Rangers, and Madison Square Garden — projects ranging from a single signed jersey to full corridor installations with branded player nameplates. Where brand consistency, archival materials, and professional installation all matter, custom framing pays for itself.
For B2B inquiries about jersey framing, locker room displays, or player milestone pieces, contact Bonnist at david@bonnist.com or 845-368-2220.
Frequently Asked Questions
What size frame do I need to frame a sports jersey?
Most adult jerseys require a frame in the 30"×36" to 32"×40" range, with football jerseys typically needing the larger footprint due to fanned-out sleeves. Always measure your jersey at full stretch before purchasing a frame — dimensions vary significantly between sports and manufacturers.
How much does it cost to have a sports jersey professionally framed?
Professional custom jersey framing starts around $285 (Framebridge, 2024 pricing) and ranges upward from there depending on frame material, matting, UV glazing, and engraving. DIY display frame kits cost considerably less but require time, tools, and careful execution to achieve comparable results.
Should I frame my jersey with the front or back facing out?
Convention depends on the sport. Baseball jerseys show the front to highlight pinstripes and chest branding. Football, basketball, soccer, and hockey jerseys typically show the back to feature the player name and number, the primary identifying elements in those sports.
Can you frame a signed jersey without damaging the autograph?
Yes, with the right precautions. Use conservation-grade UV-protective glazing to prevent ink fading, and never iron directly over the signature. Pins should avoid the signed area, and archival-quality materials should be used throughout to prevent chemical interaction with the fabric and ink.
What is the difference between a shadow box and a jersey display frame?
A shadow box has depth to accommodate dimensional items alongside the jersey: tickets, medals, photos. A standard jersey display frame is flat and sealed, offering a cleaner look for a standalone jersey.
How do I keep my jersey from wrinkling inside the frame?
Thorough ironing before framing combined with a properly fitted foam board or mat board insert. The insert creates structural tension that holds the fabric taut; pins alone won't keep a jersey looking flat and professional long-term.