DPI is the technical detail standing between a powerful branded environment and that blurry outcome. It's also one of the most misunderstood specs in large-format work, partly because screen quality masks the problem until ink hits substrate.
This guide covers what DPI actually means, how it differs from PPI (and why the distinction matters), what resolution targets to use for different applications and viewing distances, and how to prepare files correctly before production begins.
Key Takeaways
- DPI measures printer output; PPI measures your digital file — confusing them leads to preventable errors
- Viewing distance, not a universal number, determines the right DPI for any large-format project
- A 48″ × 72″ banner at 100 DPI requires a 4,800 × 7,200 pixel source file
- Vector files scale without quality loss; raster files must meet minimum PPI thresholds at final print size
- Resampling off in Photoshop: changing the DPI number alone adds zero new image data
What Is DPI and Why Does It Matter for Large Format Printing?
HP defines DPI as printer output resolution — specifically, the number of individual ink dots a printer places within one linear inch of the print surface. Higher DPI means more dots per inch, producing finer detail and smoother gradients in the physical output.
DPI directly affects three things in any print project:
- Detail sharpness — how crisp edges and fine lines appear at viewing distance
- Gradient smoothness — how cleanly the printer transitions between tones and colors
- File size — higher DPI at large dimensions creates significantly larger files
Why Scale Amplifies Every Flaw
At large format, flaws invisible on a brochure or computer screen become unavoidable. A raster image with marginal resolution might look acceptable on a 4″ × 6″ proof, but output at 10 feet wide, every missing pixel gets stretched and exposed.
Roland DG confirms that low-resolution raster files simply cannot scale up for wide-format applications without looking pixelated. No printer setting creates detail that wasn't in the source file — the output can only work with what the image already contains.
DPI and File Size
Higher DPI at large print sizes creates dramatically larger files. A 300 DPI file for a 10-foot mural would be enormous — unnecessary storage, slower processing, and no visible improvement for a print viewed from across a room. The right DPI is determined by viewing distance, not a single universal rule.
DPI is a property of the output — the printer and the physical print. It's not an intrinsic property of your digital image. That's where PPI comes in.
DPI vs. PPI: Understanding the Difference
Adobe defines PPI (pixels per inch) as the number of pixels packed into each inch of a digital image — the resolution spec that designers control when building artwork. DPI, by contrast, describes how the printer reproduces that image on a physical substrate.
The relationship is direct but one-directional: PPI governs source file quality, and DPI governs physical output. A high-DPI printer cannot manufacture image data from a low-PPI file. If the source file is under-resolved, the print will show it.
That's why the technically precise way to specify artwork quality is "effective PPI at final print size" — the pixel density your file delivers at the actual dimensions it will be printed.
The 72 PPI Screen vs. 300 PPI Print Reality
Web and screen images are standardized at roughly 72 PPI, and modern displays use pixel-smoothing technology that makes low-resolution images appear sharper than they actually are. A file can look completely acceptable on a monitor and still be under-resolved for print.
Roland notes that web images commonly sit around 72 DPI, while print images are typically 300 DPI or higher — with large-format prints often using lower DPI because viewing distance compensates. The on-screen quality you see is not a reliable indicator of what will print.
Before sending files to production, verify:
- Pixel dimensions at final output size, not just screen appearance
- Effective PPI — how resolution holds up when the image is scaled to print size
- Source file origin — screenshots and web exports are almost always too low for print
What DPI Do You Need for Large Format Printing?
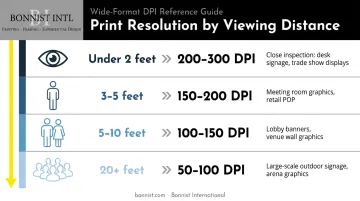
The right DPI for large format work is not a fixed number. It's primarily determined by viewing distance, and then by application type. HP's large-format guidance provides the clearest framework:
| Viewing Distance | Target PPI/DPI |
|---|---|
| Under 2 feet (arm's length) | 200–300 |
| 3–5 feet | 150–200 |
| 5–10 feet | 100–150 |
| 20+ feet (outdoor banners) | 50–100 |
DPI by Application Type
Mapping those ranges to the specific applications Bonnist International produces:
- Trade show and event displays (viewed 3–5 ft): 150–200 DPI
- Indoor branded murals and wall graphics (5–10 ft): 100–150 DPI
- Outdoor banners and building graphics (20+ ft): 50–100 DPI
- Vehicle wraps (inspected up close): 150–300 DPI depending on detail and proximity
- Billboards and large arena bowl graphics (distant viewing): 30–75 DPI
Roland DG states the wide-format industry standard as at least 100 DPI at 100% final size — a floor for indoor applications, not a ceiling.
Calculating the Pixel Dimensions You Actually Need
The formula is simple: print width in inches × target DPI = required pixel width. Apply the same calculation to height.
Example: A 48" × 72" banner intended for outdoor viewing at roughly 20 feet, targeting 100 DPI:
- Width: 48 × 100 = 4,800 pixels
- Height: 72 × 100 = 7,200 pixels
- Required file: 4,800 × 7,200 pixels
Run this calculation before sending files to production — it confirms whether your source image has enough data for the intended print size.
The Photoshop DPI Trap
A common mistake: opening a low-resolution image in Photoshop, changing the DPI number in the Image Size panel, and assuming the problem is solved. It isn't.
Adobe defines resampling as changing the actual amount of image data in a file. Each scenario produces a different result:
- Resample off: Adjusting the resolution number only redistributes existing pixels across more or fewer inches — no new detail is added
- Resample on: Photoshop interpolates new pixels, but interpolation cannot recreate detail that was never captured
- AI upscaling (Adobe Super Resolution, Topaz Gigapixel): Can recover some quality from constrained source files, but these are rescue tools — not substitutes for starting with adequate resolution
Factors That Affect Your DPI Requirements
Viewing Distance and Perceived Resolution
Viewing distance is the single biggest variable. The human eye cannot distinguish fine pixel detail beyond certain thresholds — so lower DPI becomes genuinely imperceptible at distance. HP states this directly: required resolution decreases as viewing distance increases. FESPA reinforces it, noting that indoor applications are generally viewed much closer than outdoor displays, which is why indoor murals require higher resolution than outdoor banners of similar physical size.
This is not a license to use low-quality files. The principle is calibration: match resolution to viewing distance, not to an arbitrary number.
Substrate and Material Type
HP's certified media testing evaluates print quality, printer-media interaction, and image performance together, meaning the substrate affects output quality independently of DPI.
Glossy acrylic and rigid aluminum panels have highly reflective surfaces that make pixelation more visible than a matte fabric banner would. Close-contact substrates like wall vinyl and SEG fabric viewed at near range typically require higher effective PPI than weather-resistant outdoor mesh designed for distant viewing.
The practical takeaway: always use media profiles and physical proofs for substrate-specific validation. Generic DPI rules don't replace printer, RIP, and media profile settings.
Image Content: Vector vs. Raster
This distinction matters more in large format than in most other print contexts.
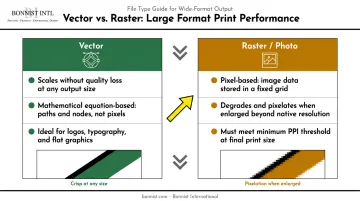
- Vector graphics (logos, typography, geometric shapes) use mathematical equations to define shapes. Adobe confirms they scale without quality loss — a vector logo printed at 3 feet or 30 feet looks equally sharp.
- Raster/photographic content is pixel-based. Enlarging it stretches existing pixels, which is why these files must meet PPI thresholds at their final print size.
For projects mixing both — a vector logo over a photographic background — the vector elements are safe at any size, but the photographic layer must be checked independently against the pixel dimension calculation above.
How to Prepare Your Files for Large Format Printing
Start With the Highest-Resolution Source
Always work from the best original file available. Scaling down from a high-resolution master is safe; scaling up a low-resolution image only stretches existing pixels. If you're working from compressed web images or small originals, resolve that before production starts.
Choose the Right File Format
| Content Type | Recommended Format | Why |
|---|---|---|
| Logos, icons, typography | EPS, SVG, PDF with live vector | Scales without quality loss |
| Photographs, complex artwork | TIFF (lossless LZW) or high-resolution PDF | Preserves full image data |
| General production handoff | PDF/X-4 | HP-recommended; preserves vector sharpness |
| Avoid for large format | JPEG | Lossy compression creates artifacts visible at scale |
HP recommends PDF/X-4 as the default production format. Roland DG aligns with PDF and EPS for wide-format work. TIFF with lossless compression is the preferred format when the primary content is photographic.
JPEG artifacts (the blocky, degraded areas caused by lossy compression) become increasingly visible as artwork is enlarged. For final print files, avoid JPEG regardless of the quality setting — the compression damage is already baked in.
Check Your Actual Pixel Dimensions
Use these checks before sending files to production:
- Photoshop: Go to Image > Image Size — confirm pixel dimensions and PPI at your intended print size, not at the file's native metadata
- Illustrator: Open Window > Links to review all placed or embedded raster assets — each must meet the PPI threshold at final print dimensions, not just at the Illustrator document scale
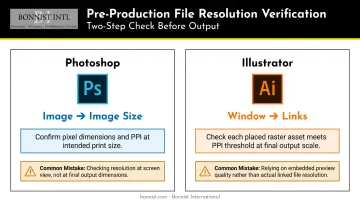
The distinction matters. A raster image that looks sharp inside an Illustrator layout can still be under-resolution once scaled to final output size.
Work With Your Production Partner Before Files Are Final
For complex branded environments (stadium graphics, hotel lobby murals, corporate experiential installations), file specifications aren't something to verify after artwork is complete. The production partner conversation needs to happen before files are finalized.
Bonnist International works with clients on spec alignment from the start — a practice that becomes critical at scale. Their MSocial Hotel NYC project required a single custom artwork design reproduced consistently across 450+ guest rooms on Dreamscape wallpaper. A file specification error in that context doesn't affect one print; it multiplies across every room. Getting specs right upfront eliminates that risk entirely.
Frequently Asked Questions
What DPI should I use for large format printing?
The right DPI depends on viewing distance. 100–150 DPI covers most large-format prints viewed from several feet away; close-up displays viewed under 2 feet may require 200–300 DPI. There is no single universal DPI for large-format work.
What DPI do I need for a 24×36 poster?
For a 24×36 poster viewed at arm's length (2–4 feet), aim for 150–300 DPI. For a display poster viewed from across a room, 100 DPI is typically sufficient.
What is the difference between DPI and PPI for printing?
PPI (pixels per inch) is the resolution of your digital source file — the spec you control in design software. DPI (dots per inch) is how the printer physically reproduces that image on the substrate. High PPI in the source file is what enables high-quality DPI output.
Can I increase DPI after my image is already created?
Changing the DPI number in Photoshop without resampling adds no new image data — it only changes how existing pixels are interpreted. Resampling or AI upscaling can recover some detail, but neither recreates detail that was never captured. Start with the highest-resolution original available.
What file format should I use for large format printing?
Use vector formats (EPS, SVG, PDF) for logos and illustrations, and TIFF or high-resolution PDF for photographs. Avoid JPEG for final print files — lossy compression creates artifacts that become visible when artwork is enlarged.
Why does my image look sharp on screen but blurry when printed large?
Screens display at roughly 72 PPI and use pixel-smoothing technology that makes low-resolution images appear sharper than they are. When the same file is physically printed and enlarged, insufficient pixel data becomes visible as blur or pixelation.