The gap between a sharp on-screen preview and a polished large format print comes down to a handful of technical decisions made before the file ever reaches production. Resolution at the final output size, color profile embedding, file format, bleed settings — get these right, and the print delivers. Miss one, and the error gets amplified at scale.
This guide walks through the exact preparation sequence for large format printing, from setting canvas dimensions to proofing against substrate-specific color profiles. Whether you're preparing files for a stadium graphic, a lobby wall mural, or a trade show display, the same core principles apply.
Key Takeaways
- Effective PPI at final output size — not the file's metadata — determines print sharpness; 300 PPI for close-up displays, 150–200 PPI for mid-distance signage
- TIFF and PDF are the safest formats; JPEG's lossy compression becomes visible at large sizes
- Embed your RGB color profile when saving — large format inkjet printers expect RGB, and missing profiles cause unpredictable color output
- Logos and text must be vector — raster logos pixelate badly when scaled to banner or mural dimensions
- Soft-proof using the substrate's ICC profile to catch color shifts before a single sheet hits the printer
How to Prepare Images for Large Format Printing
Large format preparation follows a specific sequence. Skipping steps or reversing the order creates problems that can't always be corrected at the print stage — and at the scale of a 20-foot banner or a 450-room wallpaper installation, those problems multiply fast.
Step 1: Set Your Canvas to the Final Print Dimensions
Open your design file and set the document size to match the intended print dimensions before doing anything else. Working at the correct size from the start prevents resolution mismatches that are difficult to correct later.
Bleed is non-negotiable. Extend all background colors and design elements beyond the trim edge — typically 0.125 to 0.25 inches on each side for most large format applications. After cutting, any element that doesn't reach the bleed line leaves an unprinted white edge. Keep logos, text, and critical content inside the safe zone, away from the trim boundary.
Step 2: Establish the Correct Resolution for Your Viewing Distance
PPI vs. DPI — the distinction matters. PPI (pixels per inch) describes the digital file; DPI (dots per inch) describes what the printer lays down on the substrate. The number that controls print quality is your file's effective PPI at its final output dimensions.
Effective PPI = total pixel dimensions ÷ output size in inches. That's the number to check, not the PPI tag in the file's metadata.
According to HP's large format best practices guidance, resolution requirements scale with viewing distance:
| Application | Typical Viewing Distance | Recommended PPI |
|---|---|---|
| Retail displays, trade show graphics | Close-up / under 3 ft | ~300 PPI |
| Indoor posters, lobby signage | 3–6 feet | 150–200 PPI |
| Outdoor banners and building wraps | 10+ feet | 72–100 PPI |
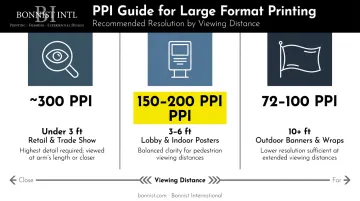
Roland DGA confirms this framework, noting that image PPI should be approximately 1/4 of the desired print DPI — so a 720 DPI printer output calls for roughly 180 PPI in the source file at actual size.
A billboard designed to be read from across a parking lot doesn't need the same file resolution as a framed lobby graphic that visitors will stand next to.
Step 3: Choose the Right File Format and Color Space
File format affects whether your image data survives the journey from your screen to the print surface intact.
- TIFF — lossless compression preserves all image data; ideal for photography and detailed artwork
- PDF — highly compatible, works well for multi-element layouts with mixed raster and vector content
- JPEG — uses lossy compression that permanently discards pixel data; Adobe confirms JPEG can introduce blocky artifacts that become obvious when images are significantly enlarged
For large format production, TIFF or PDF should be your delivery format. Save master files in TIFF or PSD and only export JPEG as a final compressed copy — never work from a re-saved JPEG as your source.
RGB vs. CMYK is not a universal answer. Most large format inkjet workflows accept and prefer RGB files — the printer's RIP software handles color conversion internally. Roland DGA specifically recommends designing in Adobe RGB 1998 for large format output. HP notes that some managed workflows request CMYK and recommends confirming with your print provider before submission.
In every case: embed the color profile when saving. Without an embedded profile, the printer software makes its own assumptions about how to interpret your color data — and those assumptions often produce visible color shifts, particularly in skin tones, brand colors, and saturated hues.
Step 4: Use Vector Graphics for Logos and Text; Optimize Rasters
Logos, brand marks, icons, and headline text must be vector. Vector files (AI, EPS, SVG) are built from mathematical paths that scale to any size without quality loss. A raster logo that looks fine on a business card becomes a pixelated mess at stadium scale.
When Bonnist International produces large-scale installations for sports venues, corporate environments, and hospitality brands — projects where a team logo or brand mark appears across dozens of barrier covers or hundreds of hotel rooms — vector source files are a baseline requirement for consistent, sharp reproduction.
For raster images (photographs, scanned artwork):
- Use Photoshop's resampling tools — Bicubic Smoother works well for enlargements; Adobe's Super Resolution feature can double linear resolution by generating additional pixel data
- Check the image at 100% zoom to confirm it holds quality at the output dimensions
- If the effective PPI falls below the recommended threshold for your viewing distance, source a higher-resolution original rather than enlarging a weak file
Step 5: Proof Your File and Confirm Specifications with Your Print Partner
Soft proofing simulates how your colors will shift on the actual print surface. Load the printer's ICC color profile for the intended substrate — paper, vinyl, canvas, backlit film, fabric — into your design software and enable soft proofing. Colors that look correct on screen often shift significantly when ink meets a specific material.
This step is substrate-specific. A proof run against a generic print profile doesn't tell you how colors will behave on matte vinyl versus backlit SEG fabric versus Dreamscape wallpaper. The profile must match the actual media being printed on.
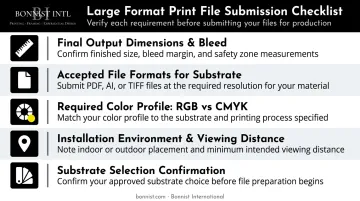
Once your soft proof looks right, run through these specs with your print partner before submitting:
- Final output dimensions and bleed requirements
- Accepted file formats for the specific substrate
- Required color profile (and whether they prefer RGB or CMYK submission)
- Any installation environment factors — ambient lighting, viewing distance — that should influence resolution or substrate selection
Experienced large format specialists factor the installation environment into production decisions, not just printer settings. For a lobby graphic viewed under warm ambient lighting versus a stadium graphic under broadcast-grade floodlights, those variables influence both substrate choice and color preparation.
Key Parameters That Affect Large Format Print Quality
Two files can follow the same preparation steps and still produce different results depending on how these variables are handled.
Resolution vs. Output Size Ratio
A file that looks sharp at 8×10 inches can look visibly pixelated when the same image fills a 10-foot wall. The pixel count doesn't grow when you scale up the canvas — only the pixel size does.
Always recalculate effective PPI after any scaling. If the result falls below the recommended threshold for your viewing distance, the print will appear soft or grainy. Address resolution at the source file level, not by stretching the image in layout software.
Color Space and Profile Embedding
Printing devices interpret color using their own internal profiles. When no profile is embedded in the submitted file, the printer software guesses — and those guesses produce color shifts that are most noticeable in skin tones, brand colors, and saturated hues.
Mismatched or missing profiles consistently produce prints that look nothing like the screen preview. Embed the correct color profile every time you save a production file.
Substrate Choice
The same image file renders differently on glossy photo paper, matte vinyl, canvas, backlit film, and fabric. Ink absorption, surface texture, and light reflection all affect how colors and fine details appear in the final output.
That variability matters at scale. When Bonnist International produced a custom mural across more than 450 hotel guest rooms on Dreamscape wallpaper, color profiling had to be matched precisely to that substrate's ink absorption characteristics. Only then could the rich urban palette stay consistent from room to room — something a generic print profile simply can't guarantee.

File Compression and Flattening
Saving a layered Photoshop file as a JPEG applies lossy compression. Saving that JPEG again applies more compression. Each cycle discards detail that becomes obvious at large sizes.
Follow these file-handling rules to protect image quality:
- Save master files in TIFF or PSD format
- Export a compressed version only as the final delivery copy
- Never use a re-saved JPEG as your working source file
Common Mistakes When Preparing Images for Large Format Printing
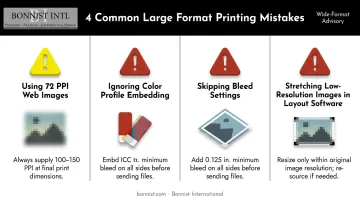
These four mistakes drive the majority of reprints, rush fees, and production delays:
- Using 72 PPI web images for large format output — web-optimized files lack the pixel density large format printing demands; always source from the original high-resolution file, never a screen-export
- Ignoring color profile embedding — without a correctly embedded profile and a substrate-specific soft proof, color shifts between screen and print are almost guaranteed; monitors display RGB light, printers lay down ink
- Skipping bleed or placing critical content too close to the trim edge — large format prints are trimmed after printing; any content inside the safety margin risks being partially cut off
- Stretching a low-resolution image in layout software — enlarging a raster image in InDesign or Illustrator doesn't create new pixel data; it only makes existing pixels larger and more visible
Troubleshooting Large Format Printing Image Issues
Even carefully prepared files can produce unexpected results. Catching problems before full production saves both time and cost.
Print Looks Blurry or Pixelated
Likely cause: Effective PPI is too low at the output size — a web-resolution source was used, or the image was scaled beyond what the file can support.
Fix: Recalculate effective PPI (total pixels ÷ output inches). If below the threshold for your viewing distance, source a higher-resolution original or reduce the output size.
Colors in Print Look Different from the Screen
Likely cause: No color profile was embedded, the wrong profile was used, or the monitor is uncalibrated — causing the design to be built around colors the printer cannot accurately reproduce.
Fix: Confirm the profile is embedded in the exported file. Run a soft proof using the printer's ICC profile for the specific substrate. Recalibrate the monitor if colors consistently appear warmer, cooler, or more saturated than expected.
White Edges Appear Along the Trim
Likely cause: Bleed was not added, or background elements stop short of the bleed line.
Fix: Extend all background colors and edge elements to the full bleed boundary, then re-export. Confirm bleed settings match your print partner's specifications before resubmitting.
These three issues account for the majority of large format printing problems. Addressing resolution, color profiles, and bleed at the file preparation stage eliminates most of them before a single proof is pulled.
Frequently Asked Questions
How do you prepare a file for large format printing?
Set the document to final print dimensions first, then establish the correct PPI for the intended viewing distance. Use TIFF or PDF, embed the color profile, and use vector graphics for logos and type. Confirm all specs with your print provider before submitting.
What is the best image format for large prints?
TIFF is the strongest choice for production files — it preserves all image data without compression loss. PDF works well for multi-element layouts. Avoid JPEG as a master file; its lossy compression removes detail that becomes visible at large sizes.
How do you design for large format printing?
Work at actual output dimensions from the start, use vector elements for logos and headline type, apply bleed to all edges, and select colors within the printer's gamut. Preview the design with a substrate-specific soft proof before finalizing — not a generic monitor view.
What DPI is needed for large format printing?
It depends on viewing distance. Close-up prints like lobby graphics or trade show displays typically need around 300 PPI. Banners and indoor signage viewed from several feet work well at 150–200 PPI. Large outdoor installations can be effective at 72–100 PPI because the human eye blends detail from a distance.
Should I use RGB or CMYK for large format printing?
RGB is generally preferred for large format inkjet — it preserves the widest color range, and most professional RIPs handle the conversion internally. If your file is already in CMYK, leave it as-is, but always embed the color profile regardless of which mode you use.